Customize Railz Connect
Explore the available settings to tailor Railz Connect to your connection journey's needs
All customizable options for design and functionalities are controlled by the options that are entered directly as parameters into the Railz Connect™ script.
Here's an example:
import RailzConnect from '@railzai/railz-connect';
import {useEffect, useRef} from "react";

function App() {
  const ref = useRef();

  useEffect(() => {
    const widget = new RailzConnect();
    widget.mount({
      parentElement: ref.current,
      widgetId: '<Your Widget Id>',
      businessName: '<Your Business Name>',
      redirectUrl: 'https://www.railz.ai/success',
      closeRedirectUrl: 'https://www.railz.ai',
      metadata: [
        {
          name: "businessLocation",
          value: "canada",
          webhookLocation: ["header", "body", "query"]
        }
      ],
      // Add additional Railz Connect configuration parameters here
    });
  },[])
  return (
    <div id='railz-connect' ref={ref}></div>
  );
}

export default App;
Opening Railz Connect
Choose which method you want Railz Connect™ to open when integrating it in your application.
| Parameter | Type | Description |
|---|---|---|
widget.open | function | Use this function to open Railz Connect™ as a modal on your application. |
widget.mount | function | Use this function to embed Railz Connect™ into your application. |
Business Name
| Parameter | Type | Description |
|---|---|---|
businessName | string | The unique identifier of the business as defined by you. If left as null, a unique identifier for the business will be assigned by Railz. The business name should be 2 to 40 characters long and must not contain any of the following special characters: % [ ] \* | ( ) { } ” |
Business Name Example
// Use this script as a guide to add custom business name to your Railz Connect™ code
import RailzConnect from "@railzai/railz-connect";
import { useEffect, useRef } from "react";

function App() {
  const ref = useRef();

  useEffect(() => {
    const widget = new RailzConnect();
    widget.mount({
      parentElement: ref.current,
      widgetId: "<Your Widget Id>",
      businessName: "myBusiness-123"
    });
  }, []);
  return <div id="railz-connect" ref={ref}></div>;
}

export default App;
Brand Customization
The theme parameter is used to update Railz Connect's theme settings to match your brand guidelines and needs. The attributes you can use in the theme object are detailed below.
Theme Properties
| Parameter | Type | Description |
|---|---|---|
logo | object | An object containing logo definition. Available on Enterprise plans only. |
fontFamily | string | A string containing font family. Available on Enterprise plans only. |
primary | object | An object containing the primary color definition. Available on Pay as You Go plans and above. |
secondary | object | An object containing the secondary color definition. Available on Pay as You Go plans and above. |
Logo Properties
| Parameter | Type | Description |
|---|---|---|
url | string | Image URL. |
style | string | CSS Object for styling the img tag.Defaults to: {maxHeight: '50px'} |
Primary Color Properties
Customize the primary CTA button colors by setting the primary parameter.
| Parameter | Type | Description |
|---|---|---|
background | string | A string containing a color hex code for the button's background. Defaults to: #000000. |
backgroundHover | string | A string containing a color hex code for the button's hover state background. |
backgroundActive | string | A string containing a color hex code for the button's active state background. |
foreground | string | A string containing a color hex code for the button's foreground (text color). |
foregroundHover | string | A string containing a color hex code for the button's active state foreground. |
foregroundActive | string | A string containing a color hex code for the button's active state foreground. |
Secondary Color Properties
Customize the color of links and borders by setting the secondary parameter.
| Parameter | Type | Description |
|---|---|---|
background | string | A string containing a color hex code. Defaults to: #38C076. |
Branding Example
// Use this script as a guide to add branding to your Railz Connect™ code
import RailzConnect from "@railzai/railz-connect";
import { useEffect, useRef } from "react";

function App() {
  const ref = useRef();

  useEffect(() => {
    const widget = new RailzConnect();
    widget.mount({
      parentElement: ref.current,
      widgetId: "<Your Widget Id>",
      theme: {
        fontFamily: "Inter",
        logo: {
          url: "https://github.com/railz-ai/railz-connect/raw/master/assets/images/railz-logo.svg",
          style: { maxHeight: "200px", height: "100px" },
        },
        primary: {
          background: "#A52EFF",
        },
        secondary: {
          background: "#3D58F3",
        },
      }
    });
  }, []);
  return <div id="railz-connect" ref={ref}></div>;
}

export default App;
Redirects
Railz Connect™ will redirect the end user to a Railz-branded landing page once their account was successfully connected. We recommend setting the redirect URL to your custom landing page, which can be a Thank You page or a landing page specific to the next step in your process.
| Parameter | Type | Description |
|---|---|---|
redirectUrl | string | The URL to redirect to when the end user has successfully finished connecting the service providers required. |
closeRedirectUrl | string | The URL to redirect to when the end user exits Railz Connect by closing the page. Should be used in conjunction with options.components.close=true. |
Redirects Example
// Use this script as a guide to add redirects to your Railz Connect™ code
import RailzConnect from "@railzai/railz-connect";
import { useEffect, useRef } from "react";

function App() {
  const ref = useRef();

  useEffect(() => {
    const widget = new RailzConnect();
    widget.mount({
      parentElement: ref.current,
      widgetId: '<Your Widget Id>',
      redirectUrl: 'https://example.ai/my-app',
      closeRedirectUrl: 'https://example.ai/my-app?close=true',
      options: {
        components: {
         close: true
        }
      },
    });
  }, []);
  return <div id="railz-connect" ref={ref}></div>;
}

export default App;
Layout & Content Customization
The parameter options is used to update both the components' visibility and text content and overall service provider settings present in Railz Connect™.
| Parameter | Type | Description |
|---|---|---|
services | object | The services object is used to configure service provider settings specific to the current Railz Connect session. See Service Providers Customization for detailed attributes. |
kinds | object | The kinds object is used to configure the business rules related to the different types of service providers. See Service Providers Customization for detailed attributes. |
sessionTimeout | number | The sessionTimeout field is used to set the idle timeout limit(in seconds) for your customers to complete connecting to service providers. |
components | object | The components object is used to hide or display specific components in Railz Connect™. See Layout Customization for detailed attributes. |
content | object | This content object is used to change the text of specific fields in Railz Connect™. See for Content Customization detailed attributes.Available on Enterprise plans only. |
Session Timeout
You may pass a value for Railz Connect™ session timeout via the options.sessionTimeout parameter. This configuration will prevent users from seeing the Timeout screen after being idle for 2 minutes in Railz Connect™.
| Parameter | Type | Description |
|---|---|---|
sessionTimeout | number | Set the timeout limit (in seconds) for your customers to complete connecting to the service providers. This timeout is only applicable to service providers that have a pop-up window to enter their login credentials. The default timeout session is 120 seconds. |
Session Timeout Example
// Use this script as a guide to add session timeout to your Railz Connect™ code
import RailzConnect from "@railzai/railz-connect";
import { useEffect, useRef } from "react";

function App() {
  const ref = useRef();

  useEffect(() => {
    const widget = new RailzConnect();
    widget.mount({
      parentElement: ref.current,
      widgetId: "<Your Widget Id>",
      options: {
        sessionTimeout: 360 // 6 minutes update
      },
    });
  }, []);
  return <div id="railz-connect" ref={ref}></div>;
}

export default App;
Service Providers Customization
Excluding Service Providers
You may pass a list of service providers you wish to exclude from Railz Connect™ via the options.services.exclude. This configuration will remove these service providers from the Railz Connect™ interface.
| Parameter | Type | Description |
|---|---|---|
exclude | array | Used to pass in the list of service providers to exclude from the Railz Connect session. See supported integrations enum values |
Making Service Providers Required
The options.kinds.hideSkip array will allow you to mark types of service providers as required to complete the connection journey.
| Parameter | Type | Description |
|---|---|---|
hideSkip | array | Used to pass in the list of services to mark required in the Railz Connect session. Valid values are banking and commerce. |
For example,
options.kinds.hideSkip = ['commerce']will require business customers to have at least one successful commerce /connection. By default, accounting service providers are required, however if you do not have any accounting integrations enabled, your business customers would be able to proceed to other enabled service providers.
Service Providers Customization Example
// Use this script as a guide to add service providers customization to your Railz Connect™ code
import RailzConnect from "@railzai/railz-connect";
import { useEffect, useRef } from "react";

function App() {
  const ref = useRef();

  useEffect(() => {
    const widget = new RailzConnect();
    widget.mount({
      parentElement: ref.current,
      widgetId: '<Your Widget Id>',
      options: {
        kinds: {
          hideSkip: ['commerce', 'banking']
        },
        services: {
          exclude: ['xero']
        }
      },
    });
  }, []);
  return <div id="railz-connect" ref={ref}></div>;
}

export default App;
Layout Customization
The options.components object parameter will allow you to control the layout of Railz Connect through a set of attributes in the table below.
| Parameter | Type | Description |
|---|---|---|
search | boolean | To show/hide the search bar in the service provider selection page. Defaults to: true |
close | boolean | To show/hide a close button to Railz Connect™, closeRedirectUrl is required, which will redirect the end user to the provided URL when they click close.Defaults to: false |
sandbox | boolean | You can show/hide the sandbox banner when in sandbox mode using this parameter. Defaults to: true |
header | boolean | You can show/hide the text from the header by specifying this parameter. Defaults to: true |
watermark | boolean | You can use this parameter to show/hide the Railz logo. Defaults to: trueAvailable on Enterprise plans only. |
terms | boolean | You can use this parameter to show/hide the Railz terms and conditions. Defaults to: trueAvailable on Enterprise plans only. |
helpLink | boolean | You can use this parameter to show/hide the need help link in the overview page and pages for service providers like Sage Intacct, Quickbooks Desktop, and Oracle Netsuite. Defaults to: trueAvailable on Enterprise plans only. |
overview | boolean | To show/hide the overview page in the connection journey. Defaults to: true |
summary | boolean | To show/hide the summary page in the connection journey. Defaults to: true |
progressBar | boolean | Able to show/hide the progress bar in the connection journey Defaults to: true |
navigableProgressBar | boolean | Able to make the progress bar selectable and act as a navigation. Defaults to: true |
back | boolean | Able to hide the back CTA in all of the Railz Connect™️ pages. Defaults to: true |
Layout Customization Example
// Use this script as a guide to add components configuration to your Railz Connect™ code
import RailzConnect from "@railzai/railz-connect";
import { useEffect, useRef } from "react";

function App() {
  const ref = useRef();

  useEffect(() => {
    const widget = new RailzConnect();
    widget.mount({
      parentElement: ref.current,
      widgetId: '<Your Widget Id>',
      options: {
        components: {
          close: false,
          sandbox: true,
          search: true,
          watermark: true,
          header: true,
          terms: true,
          navigableProgressBar: false,
          progressBar: false,
          summary: false,
          overview: false
        }
      }
    });
  }, []);
  return <div id="railz-connect" ref={ref}></div>;
}

export default App;
Content Customization
Available on Enterprise plans only.
The options.content object parameter will allow you to control the content displayed in Railz Connect through a set of attributes below.
Changing your Company or App Name
Customize the company or application name your end users will see in Raiz Connect by setting the companyName parameter in content object.
| Parameter | Type | Description |
|---|---|---|
companyName | string | Name of company or application name to display in Railz Connect. Defaults to: Company name set in Railz Dashboard. |
Changing Terms & Conditions Content
Customize the terms & conditions displayed to your end users in Railz Connect by setting the terms parameter in content object. The terms parameter is an object with the following attributes.
| Parameter | Type | Description |
|---|---|---|
terms.markup | string | HTML | Markup in the footer to display a reference to the terms and privacy text/links. Defaults to: "<b style='font-weight: bold !important'>You will be asked to connect your account and authorize <i style='font-style: italic !important'>{{customerName}}</i> to access your financial data.</b> By selecting a service provider above, you are agreeing to the " |
terms.link | string | Link to the page containing terms and privacy. Pass as null to hide the suffix link. Defaults to: Railz Connect internal terms page. |
terms.linkText | string | The terms and privacy link text label. Defaults to: Railz Terms & Conditions. |
terms.linkType | enum external \ null | Type of link to indicate if the link should reference an external page or Railz Connect internal terms page. Defaults to: null. |
Changing Overview & Summary Pages Content
Customize the content displayed to your end users on the Railz Connect overview and summary pages by setting the step and helpLink parameters in content object.
| Parameter | Type | Description |
|---|---|---|
step.overview.title | string | Text to display as the title on the overview page. Defaults to: Share Financial Information. |
step.overview.subTitle | string | Text to display as the subtitle on the overview page. Defaults to: You will be asked to connect your account to the following services and authorize <strong>{{customerName}}</strong> to access your financial data.. |
step.overview.serviceKindTitles.accounting | string | Text to display as the accounting service provider title on the overview page. Defaults to: Accounting Services |
step.overview.serviceKindTitles.banking | string | Text to display as the banking service provider title on the overview page. Defaults to: Banking Services |
step.overview.serviceKindTitles.commerce | string | Text to display as the accounting service provider title on the overview page. Defaults to: Commerce Services |
step.summary.title | string | Text to display as the title on the summary page. Defaults to: Financial Information Summary. |
step.summary.subTitle | string | Text to display as the subtitle on the summary page. Text to display as the title on the summary page. Defaults to: You have successfully connected to the following services:. |
step.summary.serviceKindTitles.accounting | string | Text to display as the accounting service provider title on the summary page. Defaults to: Accounting Services |
step.summary.serviceKindTitles.banking | string | Text to display as the banking service provider title on the summary page. Defaults to: Banking Services |
step.summary.serviceKindTitles.commerce | string | Text to display as the accounting service provider title on the overview page. Defaults to: Commerce Services |
step.summary.skippedKind | string | Text to display for skipped services in connection journey. Defaults to: Skipped |
helpLink.linkText | string | The get help link text label displayed on service provider pages like Sage Intacct, Quickbooks Desktop, and Oracle Netsuite. Defaults to: Need help?. |
helpLink.linkLocation | string | Link to the help page. |
Changing Service Provider Select Page Content
Customize the content displayed to your end users on the service provider selection page in Railz Connect by setting the serviceSelect parameter in content object. The serviceSelect parameter is an object with the following attributes.
| Parameter | Type | Description |
|---|---|---|
title | string | Text to display as the title on the service provider selection page. Defaults to: Select your service. |
subTitle | string | Text to display as the subtitle on the service provider selection page. Defaults to: Select or search for a service you wish to connect. |
subTitleNoSearch | string | Text to display as the subtitle when the search field is hidden on the service provider selection page. Defaults to: Select a service you wish to connect. |
searchLabel | string | Text to display as the search label on the service provider selection page. |
searchPlaceholder | string | Text to display as the search placeholder on the service provider selection page. Defaults to: Search. |
searchNoResult | string | Text to display if user search does not return results. Defaults to: No results found for <type of service>Note: You can only replace the text prefix to (<type of service>). |
connected | string | Text to display on the service provider card if it is connected. Defaults to: Connected |
disconnected | string | Text to display on the service provider card if it is disconnected. Defaults to: Disonnected. |
button | string | Text to display in the primary CTA button on the service provider selection page. Defaults to: Continue. |
redirectButton | string | Text to display in the redirect CTA button when the connection is completed and a redirectUrl was provided.Defaults to: Done. |
loadingTitle | string | Text to display when connecting to a service provider is in progress. Defaults to: Please wait while we connect to your account.. |
Changing Manual Service Providers Page Content
Customize the content displayed to your end users on the service provider pages requiring manual steps (non-oAuth, e.g. QuickBooks Desktop, Oracle NetSuite) by the end users by setting the manualAccountConnect parameter in content object. The manualAccountConnect parameter is an object with the following attributes.
| Parameter | Type | Description |
|---|---|---|
title | string | Text prefix to display beside the service provider name on the manual connect page. Defaults to: Configure. |
stepTitle | string | Text to display as the label of the step on the manual connect page. Defaults to: Step. |
shopify.title | string | Text to display as the title on the connect Shopify page. Defaults to: Connect your store. |
shopify.subTitle | string | Text to display as the subtitle on the connect Shopify page. Defaults to: Please provide your Shopify domain name.. |
shopify.maxCharacterHelperText | string | Text to display as the text field helper message on the connect Shopify page. Defaults to: Domain name must be more than or equal to 4 characters.. |
shopify.minCharacterHelperText | string | Text to display as the text field helper message on the connect Shopify page. Defaults to: Domain name must be less than or equal to 60 characters.. |
button | string | Text to display in the CTA button on the manual connect page. Defaults to: Next. |
copiedText | string | Text to display when a user copies the QuickBooks Desktop password on the manual connect page. Defaults to: Copied to clipboard!. |
Changing Account Selection Page Content
Customize the content displayed to your end users on the account selection page for service providers like FreshBooks by setting the accountSelection parameter in content object. The accountSelection parameter is an object with the following attributes.
| Parameter | Type | Description |
|---|---|---|
title | string | Text to display as the title with the service provider name when selecting an account. Defaults to: Select <Service> Account.Note: To use the correct service name, use {{serviceName}} in the value passed, for example, Custom text {{serviceName}} |
subTitle | string | Text to display as the subtitle with the service provider name when selecting an account. Defaults to: Choose the <Service> Account that you would like to connect to.Note: To use the correct service name, use {{serviceName}} in the value passed, for example, Custom text {{serviceName}} |
button | string | Text to display in the CTA button on the account select page. Defaults to: Continue. |
Changing Confirmation & Error Messages Content
Customize the general confirmation and error messages displayed to end users in Railz Connect by setting the parameters below in the content object.
| Parameter | Type | Description |
|---|---|---|
success.title | string | Text to display as the title on the success page. Defaults to: Success. |
success.subTitle | string | Text to display as the subtitle on the success page. Defaults to: Your <Service> Account \<account_name> has been securely linked to \<company_name>.Note: To use the correct service name, use {{serviceName}} in the value passed, for example, Custom text {{serviceName}}.To use the correct account name use {{accountName}} in the value passed, for example, Custom text {{accountName}}.You can only replace the text prefix to \<company_name>. |
success.shopifySubTitle | string | Text to display as the subtitle on the Shopify success page. Defaults to: Your <Service> Store \<store_name> has been securely linked to \<company_name>.Note: To use the correct service name, use {{serviceName}} in the value passed, for example, Custom text {{serviceName}}.To use the correct account name use {{accountName}} in the value passed, for example, Custom text {{accountName}}.You can only replace the text prefix to \<company_name>. |
success.button | string | Text to display in the CTA button on the success page. Only present when there is a redirectUrl and when there are additional services apart from accounting services.Defaults to: Done. |
success.link | string | Text to display as the add another service link on success page. Only present when there are additional service providers apart from accounting services. Defaults to: Add another service. |
duplicate.title | string | Text to display as the title on the duplicate connection page. Defaults to: Success. |
duplicate.subTitle | string | Text to display as the subtitle on the duplicate connection page. Defaults to: Your <Service> Account \<account_name> is already linked to \<company_name>.Note: To use the correct service name, use {{serviceName}} in the value passed, for example, Custom text {{serviceName}}.To use the correct account name use {{accountName}} in the value passed, for example, Custom text {{accountName}}.You can only replace the text prefix to \<company_name>. |
duplicate.shopifySubTitle | string | Text to display as the subtitle on the Shopify duplicate connection page. Defaults to: Your <Service> Store \<store_name> is already linked to \<company_name>..Note: To use the correct service name, use {{serviceName}} in the value passed, for example, Custom text {{serviceName}}.To use the correct account name use {{accountName}} in the value passed, for example, Custom text {{accountName}}.You can only replace the text prefix to \<company_name>. |
duplicate.button | string | Text to display in the CTA button on the duplicate connection page. Only present when there is a redirectUrl and when there are additional services apart from accounting services.Defaults to: Done. |
duplicate.link | string | Text to display as the add another service link on the duplicate page. Only present when there are additional service providers apart from accounting services. Defaults to: Add another service. |
error.title | string | Text to display as the title when there is an error in Railz Connect. This will not display if we could not authenticate your widgetId.Defaults to: Oops. |
error.subTitle | string | Text to display as the subtitle when there is an error in Railz Connect. This will not display if we could not authenticate your widgetId.Defaults to: Looks like there was a connection error on our end. Would you like to try again?. |
error.unauthorizedSubTitle | string | Text to display as the subtitle when unable to connect to a service provider. Defaults to: It looks like we couldn't connect to your service provider. Please try again.. |
error.verificationSubTitle | string | Text to display as the subtitle when unable to verify a connection to a service provider. Defaults to: We could not verify the connection. Please verify again or start over.. |
error.reVerify | string | Text strings to display on the failed verification button. Defaults to: Verify Again. |
error.review | string | Text strings to display on the review manual connection steps. Defaults to: Review Steps. |
error.button | string | Text to display on the try again CTA button. Defaults to: Try Again. |
expiredSession.title | string | Text to display as the title when the Railz Connect session has expired. Defaults to: Your session has expired. |
expiredSession.subTitle | string | Text to display as the subtitle when the Railz Connect session has expired. Defaults to: Please refresh the page to continue.. |
expiredSession.button | string | Text to display in the CTA button on the expired session page. Defaults to: Refresh. |
serviceUnavailable.title | string | Text to display as the title when the Railz Connect service is not available. Defaults to: This service is not available. |
serviceUnavailable.subTitle | string | Text to display as the subtitle when the Railz Connect service is not available. Defaults to: It looks like this service is not available at the moment.. |
serviceUnavailable.contact | string | Text to display on the instructions message for contacting you when service is unavailable. Defaults to: Please click on '\<button_text>' to notify \<company_name>..Note: To use the button name below, use the {{button}} in your passed value.You can only replace the text prefix to \<company_name>. |
serviceUnavailable.button | string | Text to display on the contact CTA button. Defaults to: Contact. |
Metadata
Add up to 5 metadata objects when adding a business through Railz Connect™. You will be able to view the provided metadata through the GET /businesses endpoint.
| Parameter | Type | Description |
|---|---|---|
name | string | The metadata property name - e.g. country. Should be between 2 and 40 characters. |
value | string | The metadata property value - e.g. Canada. Should be between 2 and 255 characters. |
webhookLocation | array | If provided, metadata will be sent in the webhook event response header, body and/or query param. See webhooks for more details. Valid enum values: header, body, query. |
Metadata Example
// Use this script as a guide to add metadata configuration to your Railz Connect™ code
import RailzConnect from "@railzai/railz-connect";
import { useEffect, useRef } from "react";

function App() {
  const ref = useRef();

  useEffect(() => {
    const widget = new RailzConnect();
    widget.mount({
      parentElement: ref.current,
      widgetId: '<Your Widget Id>',
      metadata: [
        {
         name: 'orgId',
         value: 'Fina-1234'
        },
        {
         name: 'uniqueId',
         value: 'uuid-1234',
         webhookLocation: ['header']
        }
      ]
    });
  }, []);
  return <div id="railz-connect" ref={ref}></div>;
}

export default App;
Customizations Example
// Use this script as a guide to add Railz Connect to your code
import RailzConnect from "@railzai/railz-connect";
import { useEffect, useRef } from "react";

function App() {
  const ref = useRef();

  useEffect(() => {
    const widget = new RailzConnect();
    widget.mount({
      parentElement: ref.current,
      widgetId: "<Your Widget Id>",
      theme: {
        fontFamily: "Inter",
        logo: {
          url: "https://github.com/railz-ai/railz-connect/raw/master/assets/images/railz-logo.svg",
          style: { maxHeight: "200px", height: "100px" },
        },
        primary: {
          background: "#A52EFF",
        },
        secondary: {
          background: "#3D58F3",
        },
      },
      metadata: [
        {
         name: 'orgId',
         value: 'Fina-1234'
        },
        {
         name: 'uniqueId',
         value: 'uuid-1234',
         webhookLocation: ['header']
        }
      ],
      options: {
        content: {
          serviceSelect: {
            title: "Select the service below",
            subTitle: "Your selection will help us serve you better",
            searchPlaceholder: "Begin typing to search",
            searchLabel: "Search Field",
          },
          terms: {
            markup:
              "<br/><br/><br/>Using this application confirms you have read our ",
            link: "https://railz.ai",
            linkText: "Terms and Condition",
            linkType: "external",
          },
        },
        services: {
          exclude: ["dynamicsBusinessCentral", "wave"],
        },
      },
    });
  }, []);
  return <div id="railz-connect" ref={ref}></div>;
}

export default App;
Result
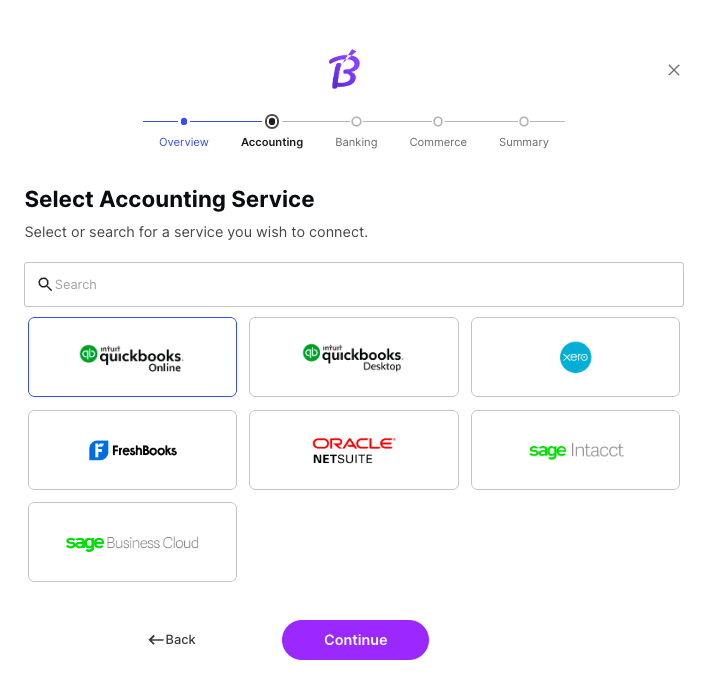
Railz Connect branded. Click to Expand.
Updated 3 months ago