
Setup Connect
Learn how to setup Connect in your application
Accounting Data as a Service™ Connect is what your end-users will interact with to link their service providers to your product. It will be embedded directly into your client-facing application for a seamless user experience.
Connect will automatically handle all of the back and forth with the service providers, as well as deal with all the different types of authorization flows used by the service providers to protect your end users from unauthorized access.
Let's quickly setup Connect to suit your brand and preferences.
Setup Connect
To instantly get Connect up and running, go to our Quickstart Guide or follow the instructions in our GitHub examples.
Installation
Node Package Manager can be used to install Connect into your frameworks. Follow the steps below to install.
Run the following command to install the package.
NPM Version
Connect follows semantic versioning format, it's important to always include the version when installing. Use the major, minor, or patch versions only, the prerelease versions might contain breaking changes but are used to indicate future changes to Connect, they should not be published to your production environments.
// with yarn
yarn add @railzai/railz-connect@latest

// with npm
npm install @railzai/railz-connect@latest --save
Setup the script in your framework of choice
Angular
<div id='railz-connect' #railzConnect></div>
import { AfterViewInit, Component, ElementRef, ViewChild } from '@angular/core';

import RailzConnect from '@railzai/railz-connect';

@Component({
    selector: 'app-root',
    templateUrl: './app.component.html',
    styleUrls: ['./app.component.css'],
})
export class AppComponent implements AfterViewInit {
    @ViewChild('railzConnect', { static: false }) railzConnect: ElementRef;

    ngAfterViewInit(): void {
        const widget = new RailzConnect();
        widget.mount({
            parentElement: this.railzConnect.nativeElement,
            widgetId: '<Your Widget Id>',
            // Add additional Railz Connect configuration parameters here
        });
    }
}
For Angular version >= 14, include allowedCommonJsDependencies in your angular.json build configurations
"build": {
  "builder": "@angular-devkit/build-angular:browser",
  "options": {
     "allowedCommonJsDependencies": [
        "@railzai/railz-connect"
     ]
   }
}
React
import RailzConnect from '@railzai/railz-connect';
import {useEffect, useRef} from "react";

function App() {
  const ref = useRef();

  useEffect(() => {
    const widget = new RailzConnect();
    widget.mount({
      parentElement: ref.current,
      widgetId: '<Your Widget Id>',
      // Add additional Railz Connect configuration parameters here
    });
  },[])
  return (
    <div id='railz-connect' ref={ref}></div>
  );
}

export default App;
Vue.js
<script setup>
  import { ref, onMounted } from 'vue'
  import RailzConnect from "@railzai/railz-connect";

  const railzConnect = ref()

  onMounted(() => {
    const widget = new RailzConnect();
    widget.mount({
      parentElement: railzConnect.value,
      widgetId: '<Your Widget Id>',
      // Add additional Railz Connect configuration parameters here
    });
  })
</script>

<template>
  <div ref="railzConnect"></div>
</template>
Vanilla
<!-- Insert this div where you want Connect to be initialized -->
<div id="railz-connect"></div>


<!-- Start of Connect script -->
<script src="https://cdn.jsdelivr.net/npm/@railzai/railz-connect@latest/dist/railz-connect.js"></script>
<script>
  var widget = new RailzConnect();
  widget.mount({
    parentElement: document.getElementById('railz-connect'),
    widgetId: '<Your Widget Id>',
  	// Add additional Railz Connect configuration parameters here
  });
</script>
<!-- End of Connect script -->
Configure your Connect
You have a variety of design configuration options to fit your brand experience. See customize Connect for more details.
IP Whitelisting (Optional)
For additional security, you can restrict the server IP addresses that can embed Connect. To enable IP Whitelisting, from the IP Whitelist page, you must add the public IP addresses of all application servers embedding Connect.
IP Whitelisting
- IP Whitelisting does not apply to Connect in Sandbox Mode.
- For testing Connect on your local environment with a non-sandbox
widgetId, you will need to whitelist your local server IP address. You can setup a local server using a tunnel service like ngrok and whitelisting the ngrok IP. You would need topingyour ngrok URL to get the IP address being used. You might need to whitelist multiple IP addresses depending on your location.- IPv6 is currently not supported.
To manage your IP Whitelist:
- In the left sidebar navigation menu, go to Connect > IP Whitelist**.
- Click the Add IP Address button to add an IP to the whitelist.
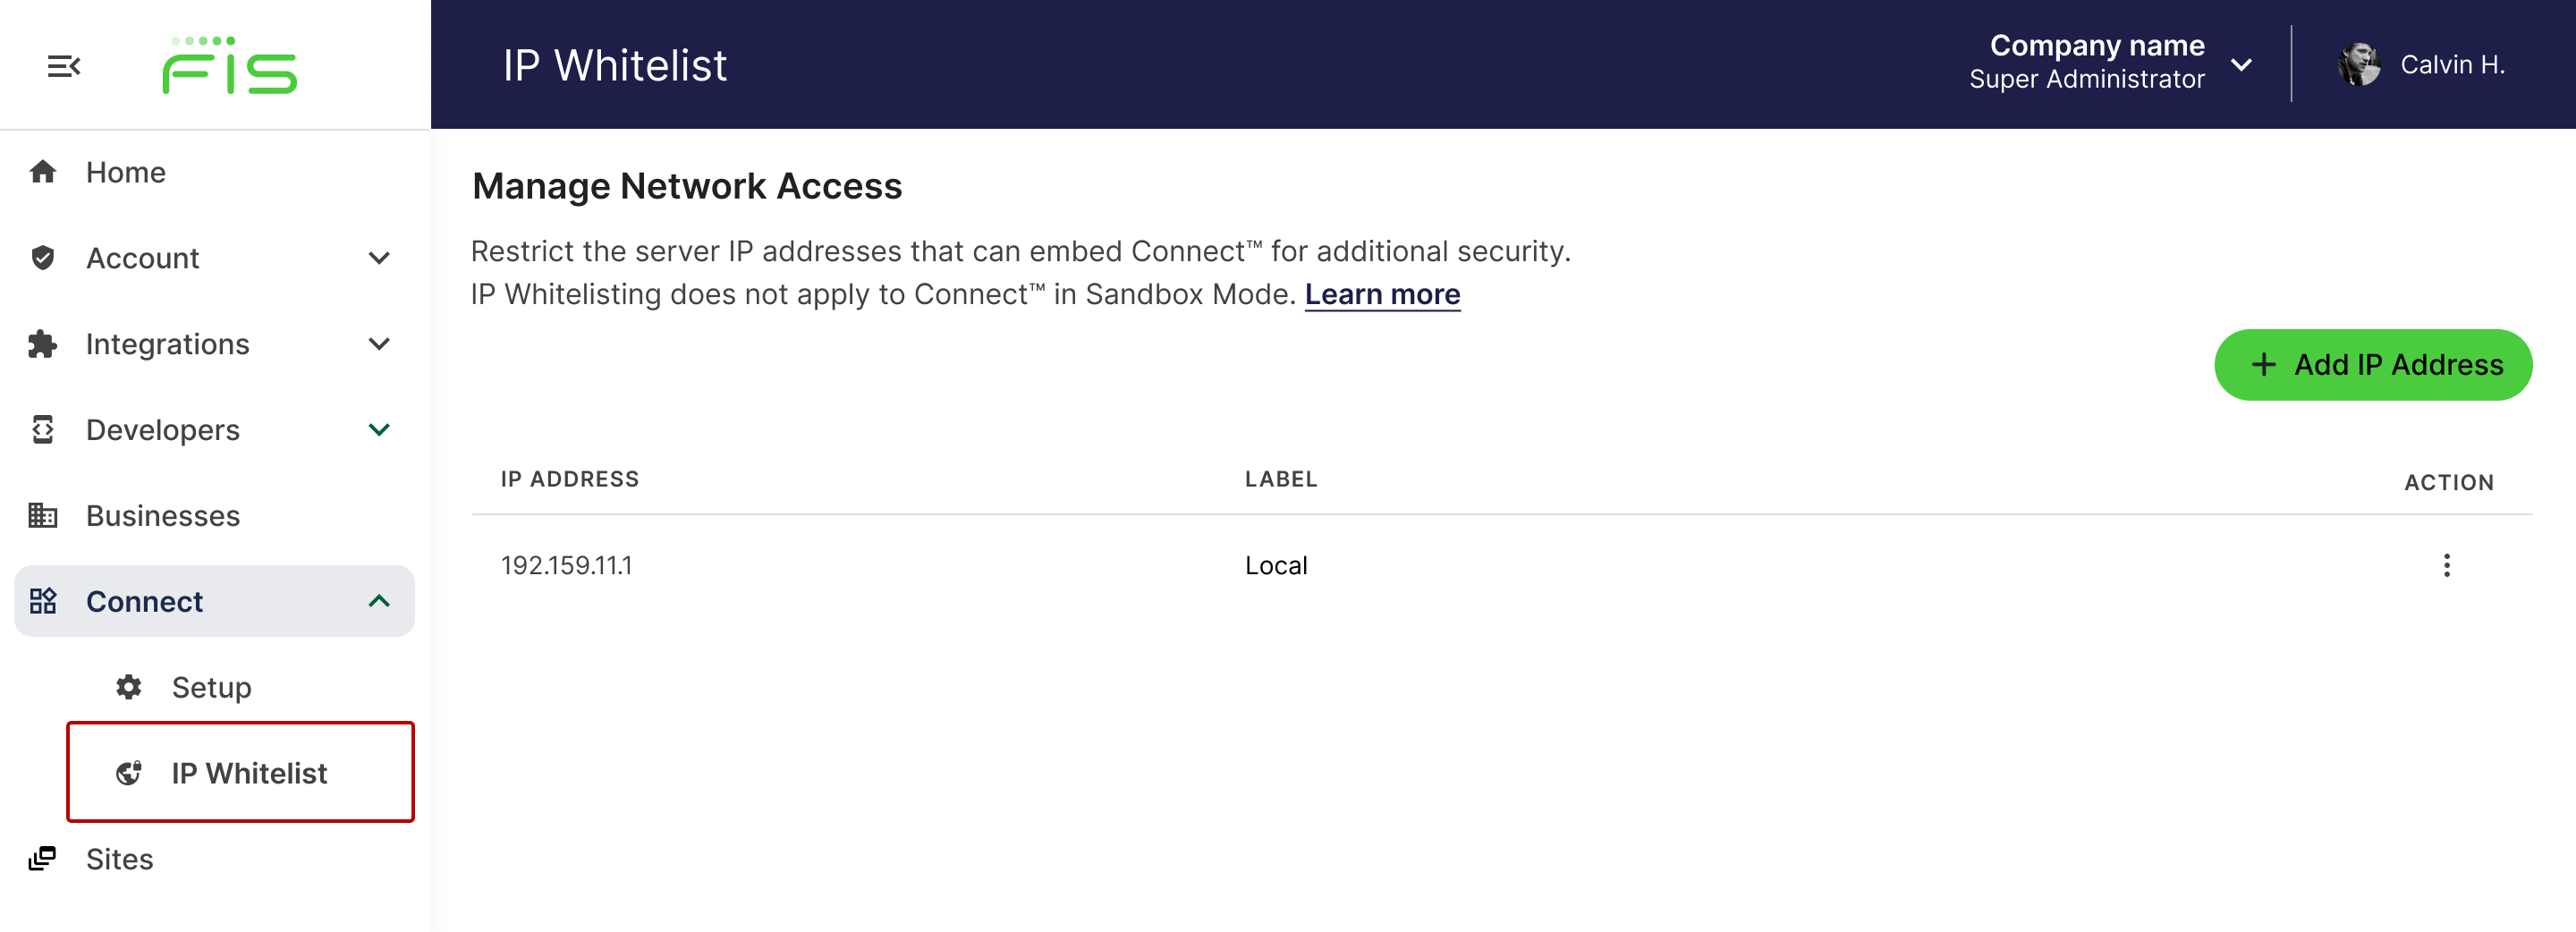
Manage IP whitelisting for Connect. Click to Expand.
- Enter the IP address you would like to whitelist, enter a Label to easily identify your IP, then click Save changes.

Add IP Address to IP whitelist in Dashboard. Click to Expand.
Service Not Available Screen
Connect will display service not available screen if:
- You have not configured and enabled any integrations.
- You have reached your connection limit on a free plan.
- Accessed Connect from an IP not in your IP whitelist (if enabled).

Connect Not Available. Click to Expand.
Preventing Duplicate Accounting Connections
When a user links their accounting service provider account through Accounting Data as a Service™, a new connection is created. Two connections created for the same set of credentials (account) at the same accounting service provider will be considered a duplicate and will result in the most recent one being invalidated.
Preventing a user from accidentally linking a connection they have already linked can help avoid confusing behaviour in your application and will also prevent you from potentially being billed for both connections.
See Connection Disconnected for more details on subscribing to connection disconnected webhook event.
Updated over 1 year ago